Reading time: 28 min
Head-Tracked 3D Web Experiences: MediaPipe, Three.js, and Shader-Based Parallax
A practical guide to building browser-based head-tracked 3D experiences with webcam tracking, MediaPipe Face Landmarker, Three.js, VideoTexture, GLSL shaders, smoothing, latency compensation, and safety limits.
Most 3D web experiences are controlled by the mouse, scroll, or device orientation. But there is a more physical interaction: the scene changes when the viewer moves their head.
That idea is called head-coupled perspective. The screen behaves less like a flat image and more like a small window. Move your head left, and the perspective shifts. Move closer, and the depth changes. Done well, the effect feels surprisingly spatial even without VR glasses.
A recent Habr article explored this idea through a technical experiment: using webcam-based face tracking, MediaPipe landmarks, Three.js, WebGL shaders, smoothing, and prediction to make stereo video feel more responsive on a normal monitor. The implementation is not the same as true volumetric rendering, but the engineering lessons are useful for frontend developers building experimental 3D interfaces.
This article turns that idea into a practical web-development guide. We will not copy the original implementation. Instead, we will build a safer architecture for browser-based head-tracked 3D experiences: webcam input, MediaPipe Face Landmarker, normalized head position, smoothing, latency compensation, Three.js rendering, shader-based parallax, fallback behavior, and debugging checklists.
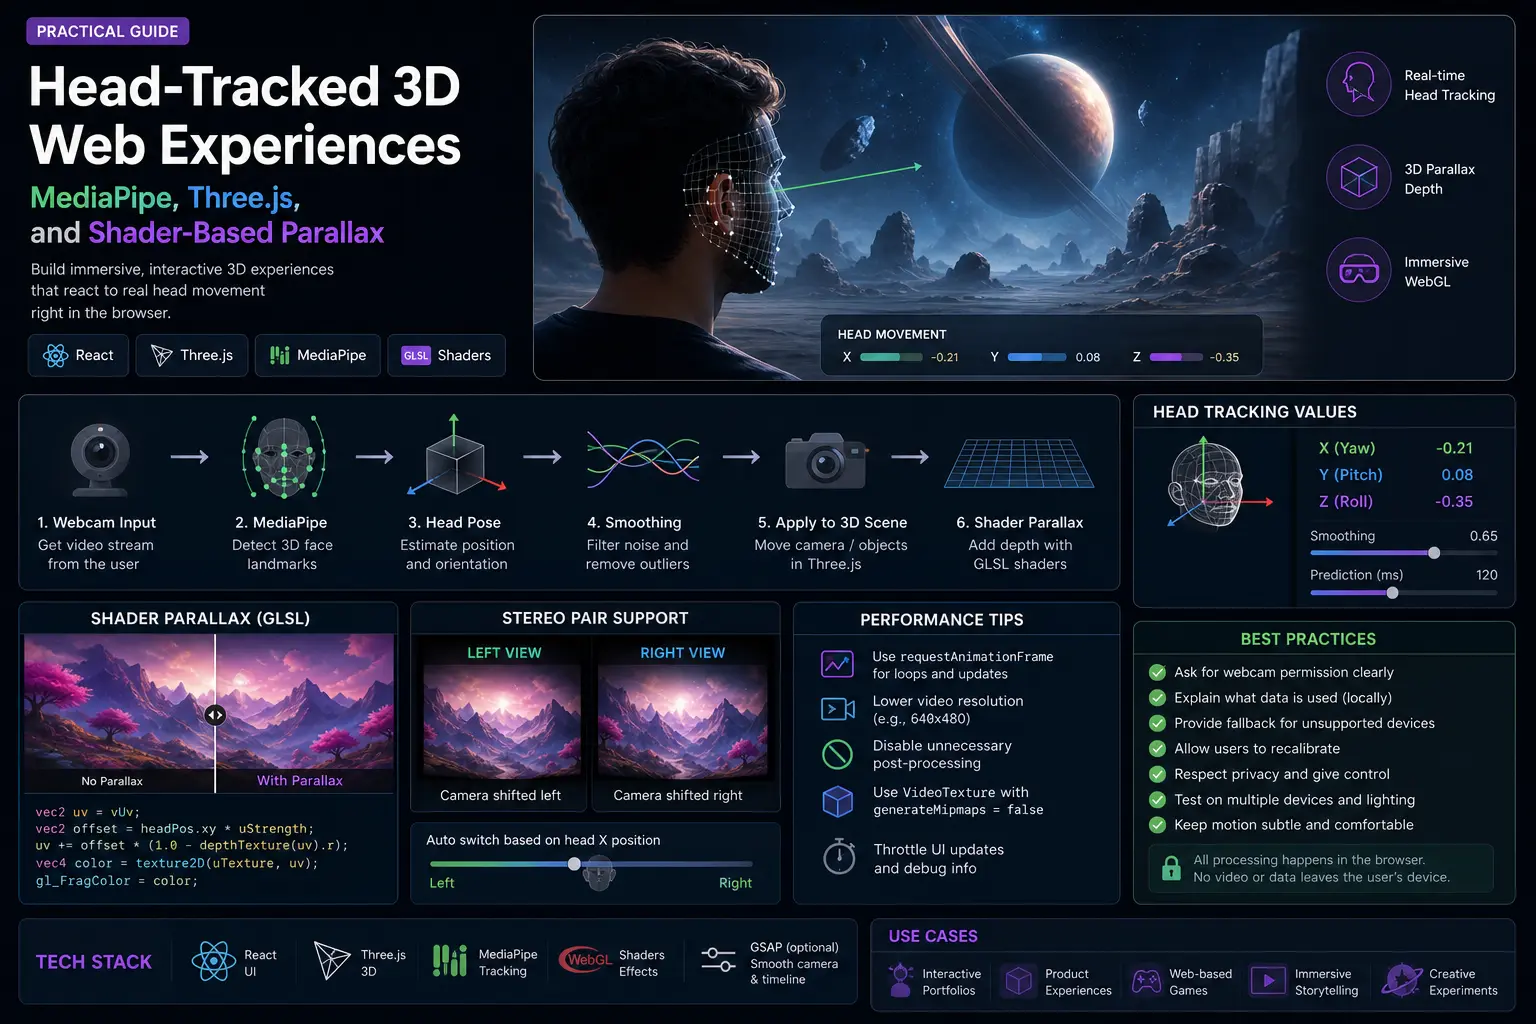
What We Are Building
The goal is a web experience where the visual perspective reacts to the viewer’s head position.
A simple version can use:
- webcam access;
- MediaPipe Face Landmarker;
- normalized head position;
- smoothing and outlier rejection;
- optional prediction to reduce perceived latency;
- Three.js scene or video plane;
- shader-based parallax or camera movement;
- safe fallback when tracking fails.
This pattern can power:
- interactive product demos;
- experimental landing pages;
- 3D portfolio scenes;
- WebGL hero sections;
- educational visualizations;
- glasses-free depth experiments;
- webcam-controlled art projects.
The key is to be honest about the limitations. Webcam-based head tracking can create a strong illusion of depth, but it is not the same as real stereoscopic display, VR, or volumetric rendering.
The Difference Between True 3D and a 2D Parallax Trick
There are two very different ways to create a head-tracked 3D effect.
The first is true 3D rendering. You have an actual 3D scene, camera, geometry, depth, occlusion, and lighting. When the viewer moves, the virtual camera changes position and the scene is rendered from the new viewpoint.
The second is a 2D or stereo-video trick. You do not have full 3D data. You may have a flat image, a stereo pair, a depth map, or two fixed views. When the viewer moves, you shift UVs, blend views, or fake parallax in a shader.
Comparison:
| Approach | Data source | What changes with head movement | Strength | Limitation |
|---|---|---|---|---|
| Real 3D scene | Meshes, splats, voxels, point clouds | Camera projection and view | Correct perspective | Needs 3D data |
| Stereo pair | Left/right images or video | View blend or switching | Works with existing stereo content | Only two fixed viewpoints |
| 2D image + depth | Image plus depth map | UV displacement | Lightweight illusion | Occlusion artifacts |
| Pure 2D shift | One image/video | Small UV shift | Easy to implement | Weak depth illusion |
For production web design, the safest starting point is usually a real Three.js scene or a simple image/depth trick. Processing full movies into volumetric content is a different technical and legal problem.
The Architecture
A practical browser architecture looks like this:
txtCopywebcam video
  → MediaPipe Face Landmarker
  → face landmarks
  → head position estimator
  → smoothing + outlier rejection
  → optional prediction
  → normalized head vector
  → Three.js camera or shader uniforms
  → WebGL scene
Each layer should be testable on its own.
Do not start with the shader. Start by proving that head tracking is stable. Then connect it to a simple 3D object. Only after that should you add video textures, stereo pairs, or custom GLSL.
Step 1: Request Camera Access Safely
Webcam access requires user permission and should only start after a clear user action.
Example:
tsCopyexport async function createWebcamStream() {
  return navigator.mediaDevices.getUserMedia({
    video: {
      width: { ideal: 640 },
      height: { ideal: 480 },
      facingMode: "user",
    },
    audio: false,
  });
}
UX rules:
- explain why the camera is needed;
- do not start tracking before consent;
- show a clear camera-on state;
- provide a disable button;
- do not record or upload video unless explicitly required;
- process frames locally when possible.
For a public landing page, camera-based interaction should be optional. Never make the core content depend on webcam permission.
Step 2: Initialize MediaPipe Face Landmarker
MediaPipe Face Landmarker is a browser-friendly way to detect 3D face landmarks from video frames. Google’s documentation describes it as a task for detecting face landmarks and facial expressions in images and videos, with support for web and JavaScript apps.
A simplified setup:
tsCopyimport { FaceLandmarker, FilesetResolver } from "@mediapipe/tasks-vision";

export async function createFaceLandmarker() {
  const vision = await FilesetResolver.forVisionTasks(
    "https://cdn.jsdelivr.net/npm/@mediapipe/tasks-vision@latest/wasm"
  );

  return FaceLandmarker.createFromOptions(vision, {
    baseOptions: {
      modelAssetPath:
        "https://storage.googleapis.com/mediapipe-models/face_landmarker/face_landmarker/float16/1/face_landmarker.task",
      delegate: "GPU",
    },
    runningMode: "VIDEO",
    numFaces: 1,
    outputFaceBlendshapes: false,
    outputFacialTransformationMatrixes: false,
  });
}
The exact configuration depends on the effect. If you only need head position, you may not need blendshapes. If you need face orientation or more precise transforms, transformation matrices may be useful.
Important: use the official docs for current model paths and package versions because MediaPipe APIs can change.
Step 3: Estimate Head Position
The simplest head-position estimator uses eye landmarks.
You can calculate:
- horizontal position from the midpoint between left and right eye;
- vertical position from the same midpoint;
- approximate distance from the apparent distance between the eyes;
- optional gaze signal from iris landmarks.
Example:
tsCopytype HeadPosition = {
  x: number;
  y: number;
  z: number;
};

export function estimateHeadPosition(landmarks: Array<{ x: number; y: number; z?: number }>): HeadPosition {
  const leftEye = landmarks[33];
  const rightEye = landmarks[263];

  const centerX = (leftEye.x + rightEye.x) / 2;
  const centerY = (leftEye.y + rightEye.y) / 2;
  const eyeDistance = Math.hypot(rightEye.x - leftEye.x, rightEye.y - leftEye.y);

  return {
    x: (centerX - 0.5) * 2,
    y: (centerY - 0.5) * 2,
    z: 1 / Math.max(eyeDistance, 0.001),
  };
}
This is not a calibrated physical measurement. It is a normalized signal for an interactive effect.
If you need real-world distance, calibration becomes much harder. Camera FOV, lens distortion, face size, device placement, and user posture all affect the estimate.
Step 4: Smooth the Signal
Raw face tracking is noisy. If you feed raw coordinates directly into a camera or shader, the scene will shimmer.
The simplest filter is exponential smoothing:
tsCopytype Vec3 = { x: number; y: number; z: number };

export function smoothVec3(previous: Vec3, next: Vec3, alpha = 0.85): Vec3 {
  return {
    x: previous.x * alpha + next.x * (1 - alpha),
    y: previous.y * alpha + next.y * (1 - alpha),
    z: previous.z * alpha + next.z * (1 - alpha),
  };
}
Higher alpha means smoother but more lag. Lower alpha means faster but shakier.
For a real effect, add outlier rejection:
tsCopyexport function clampJump(previous: Vec3, next: Vec3, maxJump = 0.08): Vec3 {
  const clampAxis = (prev: number, value: number) => {
    const delta = value - prev;
    if (Math.abs(delta) <= maxJump) return value;
    return prev + Math.sign(delta) * maxJump;
  };

  return {
    x: clampAxis(previous.x, next.x),
    y: clampAxis(previous.y, next.y),
    z: clampAxis(previous.z, next.z),
  };
}
Smoothing is where many demos either feel laggy or unstable. You usually need to tune values by testing on real devices.
Step 5: Add Simple Prediction
Smoothing adds lag. Prediction can reduce the feeling of delay by estimating where the head will be a few milliseconds in the future.
A lightweight velocity prediction:
tsCopytype TrackedState = {
  position: Vec3;
  velocity: Vec3;
};

export function updateTracker(state: TrackedState, measurement: Vec3, dt: number): TrackedState {
  const safeDt = Math.max(dt, 1 / 120);

  const velocity = {
    x: (measurement.x - state.position.x) / safeDt,
    y: (measurement.y - state.position.y) / safeDt,
    z: (measurement.z - state.position.z) / safeDt,
  };

  return {
    position: measurement,
    velocity: smoothVec3(state.velocity, velocity, 0.8),
  };
}

export function predictPosition(state: TrackedState, lookahead = 0.02): Vec3 {
  return {
    x: state.position.x + state.velocity.x * lookahead,
    y: state.position.y + state.velocity.y * lookahead,
    z: state.position.z + state.velocity.z * lookahead,
  };
}
Prediction should be subtle. Too much prediction creates overshoot and makes the scene feel floaty.
A good starting range is 10–30 ms, then tune by feel.
Step 6: Connect Head Position to a Three.js Camera
If you have a real 3D scene, the cleanest effect is to move the camera slightly based on head position.
Example concept:
tsCopyfunction updateCameraFromHead(camera: THREE.PerspectiveCamera, head: Vec3) {
  camera.position.x = head.x * 0.8;
  camera.position.y = -head.y * 0.45 + 1.2;
  camera.position.z = 5 + (head.z - 4) * 0.12;
  camera.lookAt(0, 0, 0);
}
Do not exaggerate the movement. A small, stable parallax feels better than a dramatic camera swing.
For product scenes, keep the object readable. The head-tracking effect should add depth, not make the layout hard to use.
Step 7: Shader-Based Parallax for Video or Images
If you are working with video or images instead of full 3D geometry, you can fake depth with a shader.
A simple fragment shader can shift UV coordinates based on head position:
glslCopyprecision highp float;

uniform sampler2D uTexture;
uniform vec2 uHead;
uniform float uStrength;
varying vec2 vUv;

void main() {
  vec2 parallaxUv = vUv + vec2(uHead.x, -uHead.y) * uStrength;
  gl_FragColor = texture2D(uTexture, parallaxUv);
}
This is only a visual trick. It shifts the whole image. It does not create true occlusion or reveal hidden surfaces.
For better results, use a depth map:
glslCopyprecision highp float;

uniform sampler2D uColor;
uniform sampler2D uDepth;
uniform vec2 uHead;
uniform float uStrength;
varying vec2 vUv;

void main() {
  float depth = texture2D(uDepth, vUv).r;
  vec2 offset = uHead * (depth - 0.5) * uStrength;
  gl_FragColor = texture2D(uColor, vUv + offset);
}
Depth-based UV displacement can look convincing for small movements, but it will break around edges because there is no real hidden background behind foreground objects.
Step 8: Stereo Pair View Switching
If the source is a stereo pair, the shader can sample left and right views separately.
For top-bottom stereo:
glslCopyvec2 leftUv = vec2(vUv.x, vUv.y * 0.5 + 0.5);
vec2 rightUv = vec2(vUv.x, vUv.y * 0.5);
For side-by-side stereo:
glslCopyvec2 leftUv = vec2(vUv.x * 0.5, vUv.y);
vec2 rightUv = vec2(vUv.x * 0.5 + 0.5, vUv.y);
Then blend based on horizontal head position:
glslCopyfloat t = smoothstep(-0.4, 0.4, uHead.x);
vec4 leftColor = texture2D(uTexture, leftUv);
vec4 rightColor = texture2D(uTexture, rightUv);
gl_FragColor = mix(leftColor, rightColor, t);
This can create a depth impression, but it has a major limitation: there are only two real views. Any position between them is interpolation, not true camera movement.
Step 9: Use Three.js VideoTexture Carefully
Three.js VideoTexture is useful when rendering video into a WebGL scene. The official Three.js docs note that VideoTexture has generateMipmaps overwritten and set to false by default.
Basic setup:
tsCopyconst video = document.createElement("video");
video.src = "/demo-stereo.mp4";
video.crossOrigin = "anonymous";
video.loop = true;
video.muted = true;
video.playsInline = true;
await video.play();

const texture = new THREE.VideoTexture(video);
texture.minFilter = THREE.LinearFilter;
texture.magFilter = THREE.LinearFilter;
texture.generateMipmaps = false;
texture.colorSpace = THREE.SRGBColorSpace;
Video in WebGL has real performance costs. Keep resolution reasonable, avoid unnecessary post-processing, and test on weaker laptops.
Step 10: Tracking Failure Fallback
The experience should not collapse when tracking fails.
Fallback rules:
- if no face is detected, ease back to center;
- if tracking is unstable, reduce strength;
- if camera permission is denied, show a normal 3D scene;
- if performance is poor, disable head-tracked mode;
- if the tab is hidden, pause detection;
- if the user disables the camera, stop the stream and release tracks.
Example fallback behavior:
tsCopyfunction stopWebcam(stream: MediaStream) {
  for (const track of stream.getTracks()) {
    track.stop();
  }
}
Head tracking should feel like an enhancement. It should not be required to understand or navigate the page.
Privacy and UX Rules
Camera-based web experiences need clear privacy boundaries.
Good rules:
- process frames locally when possible;
- do not store raw webcam video;
- do not send frames to a server unless absolutely necessary;
- explain what is tracked;
- provide a clear opt-out;
- show tracking status;
- avoid face identity claims;
- do not use this for sensitive inference.
The effect should track head position for interaction, not identify the user.
This matters for trust. A beautiful WebGL demo can feel creepy if the camera behavior is not explained.
Performance Checklist
Real-time camera + ML + WebGL can become expensive.
Check:
- webcam resolution;
- detection FPS;
- GPU delegate availability;
- model load time;
- render FPS;
- shader cost;
- video texture resolution;
- memory usage;
- battery usage on laptops;
- fallback behavior on weak devices.
Optimization ideas:
- process face tracking at 15–30 FPS, not necessarily every render frame;
- render WebGL at device-pixel-ratio caps;
- avoid heavy post-processing;
- use simple geometry first;
- pause tracking when the section is not visible;
- use requestAnimationFrame carefully;
- avoid React state updates for every tracking frame.
A good head-tracked effect is smooth because the whole pipeline is controlled, not because one layer is fast.
Debugging Checklist
Use this checklist when the effect feels wrong:
mdCopy## Head-Tracked 3D Debugging Checklist

### Tracking
- [ ] Face is detected consistently.
- [ ] Head position returns to center when the user is centered.
- [ ] Tracking does not jump when the user blinks or turns slightly.
- [ ] No-face state eases back to neutral.

### Smoothing
- [ ] Signal is stable when the head is still.
- [ ] Movement does not feel too delayed.
- [ ] Outliers are clamped.
- [ ] Prediction does not overshoot.

### Rendering
- [ ] Camera movement is subtle.
- [ ] Shader strength is not exaggerated.
- [ ] Video texture is sharp enough.
- [ ] Frame rate stays stable.

### UX
- [ ] Camera permission is explained.
- [ ] User can disable tracking.
- [ ] The page works without camera permission.
- [ ] Reduced-motion users are respected.
When This Pattern Makes Sense
Use head-tracked 3D when the interaction strengthens the experience.
Good use cases:
- premium WebGL landing pages;
- product reveal scenes;
- interactive museum or education pages;
- experimental media players;
- art projects;
- depth demos;
- prototype interfaces for spatial computing.
Avoid it when:
- the content is mainly text;
- performance budget is tight;
- camera permission would hurt trust;
- the experience must work perfectly on every device;
- the team cannot maintain WebGL or ML code;
- accessibility requirements conflict with the effect.
The feature is impressive, but it should not be the entire product value.
How to Use AI Coding Agents for This
AI agents can help, but this is not a one-prompt project.
Good phases:
-
Tracking prototype
Ask the agent to build webcam + MediaPipe tracking and display normalized coordinates. -
Smoothing layer
Add EMA, outlier clamp, and no-face fallback. -
Three.js scene
Connect head position to a simple cube or product object. -
Shader experiment
Add UV displacement or stereo-pair sampling. -
Performance pass
Reduce detection FPS, cap DPR, avoid React state per frame. -
Privacy and UX pass
Add permission explanation, disable button, fallback.
Bad prompt:
txtCopyBuild a 3D movie player with eye tracking.
Better prompt:
txtCopyBuild only the first prototype: webcam permission, MediaPipe Face Landmarker, normalized head x/y/z values, and a debug panel. Do not add Three.js yet. Include cleanup for camera tracks.
For complex WebGL/ML experiences, small agent tasks are safer than one giant generation.
Common Mistakes
Avoid these mistakes:
- treating 2D UV shifting as true 3D;
- exaggerating parallax strength;
- feeding raw landmarks directly into camera movement;
- using React state for every tracking frame;
- skipping no-face fallback;
- hiding camera usage from the user;
- ignoring performance on weak devices;
- building stereo view switching without explaining its limitations;
- making the core page unusable without webcam permission;
- asking an AI agent to build the full system in one step.
The best version is not the most technically aggressive one. It is the one that feels stable, respectful, and useful.
Conclusion
Head-tracked 3D on the web is a fascinating interaction pattern. With only a webcam, MediaPipe, Three.js, and a controlled render pipeline, you can make a flat screen feel more spatial.
But the effect depends on engineering discipline: stable tracking, smoothing, latency control, subtle camera movement, shader limits, performance budgets, privacy boundaries, and graceful fallback.
If you have a real 3D scene, move the camera. If you only have 2D or stereo content, be honest that you are creating an illusion with UV shifts or view blending. Both can be useful when used carefully.
Build the pipeline one layer at a time. First tracking. Then smoothing. Then rendering. Then shader tricks. Then fallbacks. That is how a browser experiment becomes a production-ready interactive experience.